Mixed Media Scrapbook Layout: My Favorite Helper


Hello fellow scrapbookers.  Thank you as always for stopping by for our monthly blog hop featuring this months Clique Kit named Cave Girl.  This month we are using the collection by Pink Paislee "Memorandeum".  I have loved all the creativity this blog hop provides.  I enjoy the hop myself and become inspired by others who have also purchased the kit.  


I am the proud new owner of a Silhoutte Cameo and decided to take advantage of the free cut file available this month and loved this paper clip background.  I had thought about cutting it out on black card stock and decided to still do it with white, because you know I'm going to want to color it up and do some mixed media work with it on my own.  Its not a layout of mine, lately, without mixed media added to the mix.  I will be doing another one here soon using the quote cut file as well.   


I used Dina Wakley Gel Medium from Ranger to adhere the intricate background to the patterned paper Time Clock from the collection.  The kit this month came with the collections acetate cut apart page as well.  I am scrapping a picture of my rescue moxie Kobe on my craft room desk amongst my pictures, patterned paper, pens and brushes so the pencil image was perfect.  I backed it with the white card stock to keep it sturdy.  


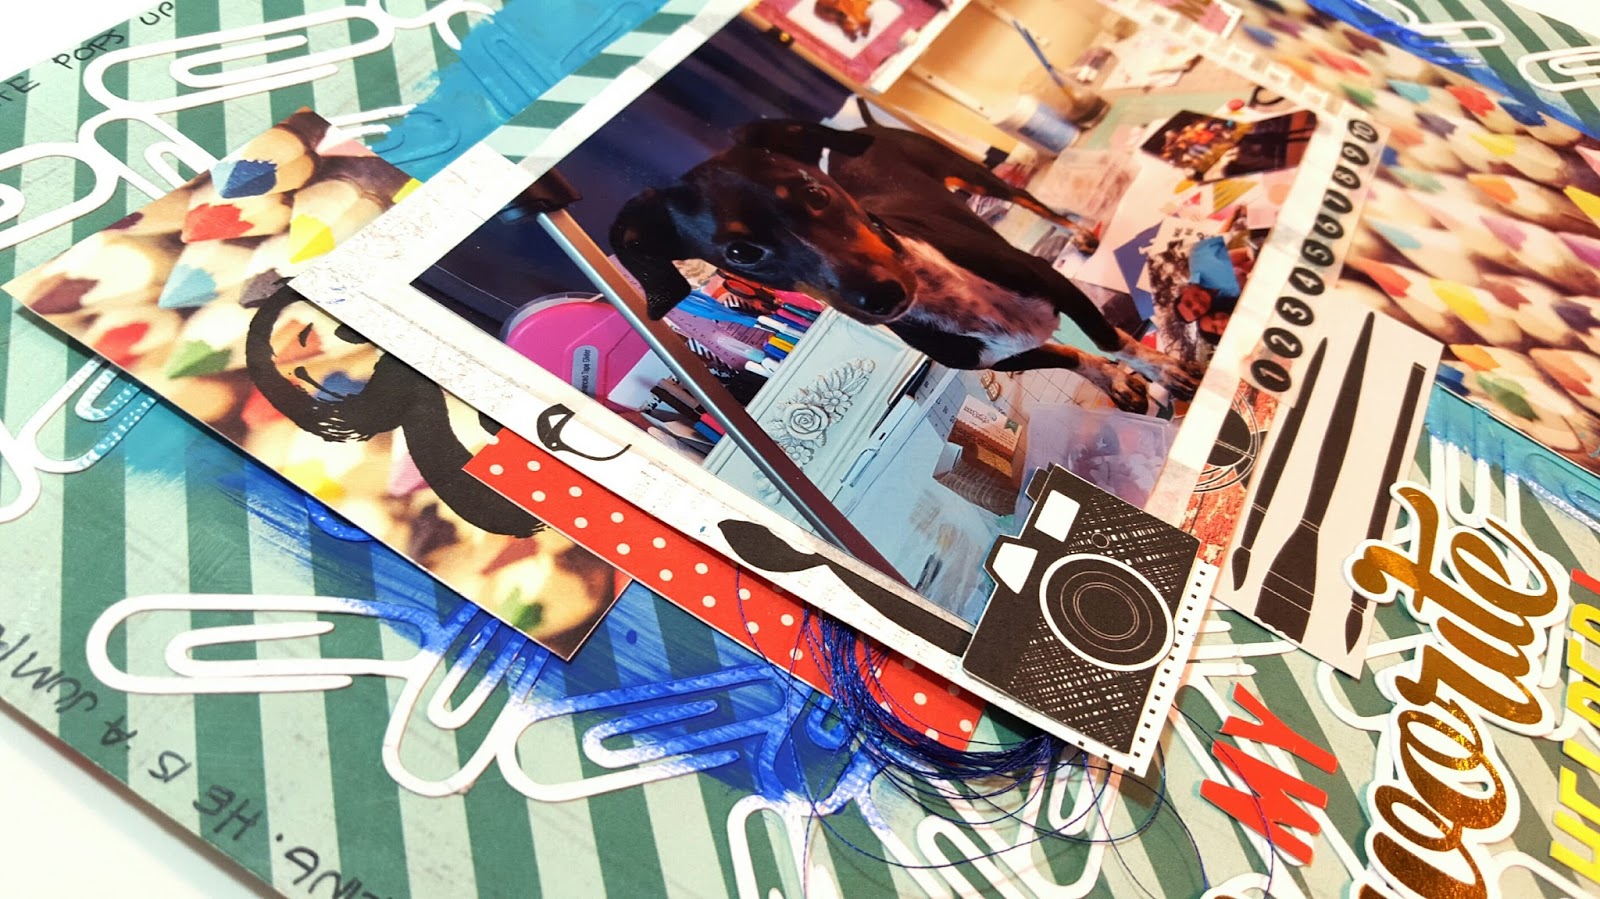
I matted my photo with white tissue paper and then used the card stock cut apart to add another layer.  The few empherma pieces used were all cut out of the same paper.  In order to jazz up my layout some more, I needed to add mixed media.  I decided on a few blue brush strokes along the edge would be just enough.  I used cobalt blue, Caribbean  and Ocean breeze from Apple Barrel were perfect. The word 'favorite' in my title is from the kit as well has the colorful alphas from Bella Blvd.  I finished off the layout with some tangled thread, washi tape accents and journaling along the edges.  


Its a bright and cheerful layout and I hope you have enjoyed the close up photos.  I did film a process video: 

Thank you for stopping by.  Here is the list of the other blogs to hop on over too. 


Carpe Diem Planner by Simple Stories

Hello lovely scrapbooker and planner addicts alike.  I have recently purchased the new Carpe Diem Planner by Simple Stories and have been using it for the month of December.  The size is A5 and the binder is similar in size to the A5 Filofax Saffiano I own.  The binder itself does use the six ring system, similar to the Filofax as well.  The inside cover has 6 business card pockets along with a secretarial pocket for larger items.  I chose the color Aqua, but it also comes in pink, coral, robin's egg blue, platinum, and black.  The planner comes undated which allows you the flexibility to start using this planner at any time.  The dividers are labeled with the month and only the label itself is laminated and not the divider.  I may be altering that feature in the future because I know I am rough and it will get abused.  The month is on two pages and is printed on heavier card stock compared to the paper the week on two pages is printed on.  The complete Carpe Diem line has everything to decorate the planner from stickers, die cuts, paper clips, bookmarks, folder pockets, appointment stickers and washi tape that all match.  I am an enabler I know, but all of it is all so lovely.  
The inserts are pretty and semi decorated.  Most planner lovers with continue to embellish their pages some more, but for those who may not have the time to do so, the pages already are minimally decorated.  The planner simply came with the months, weeks and an opening page per month for important dates and goal setting.  There are no other sections provided.  There is a blank pad of lined paper that is held in the back cover pocket.  I have added in my own extra dividers to customize my planner to my needs.  I use inserts to keep track of my YouTube Channel, blog and social media.  
The paper quality for the weekly section is not great.  It is lighter to me than copy paper.  This is my only disappointing aspect of this planner.  I did a first impressions video in which I did a pen test and ink test to show which bleed through or shadow and which can be used on this paper.  

The beauty of having a ring system planner is the customizability.  I have gone back and forth throughout my life to a spiral bound to a binder to hardbound, and round and round I go.  But to have a planner work efficiently for you and your needs, rings is always the way to go.  For the festive month of December I filmed a 'Plan with Me' video if you would like to have a look.  

Thank you for stopping by,
EVI

December Daily: Days 1-6

The first week of December has gone by so quickly.  It has been fun completely each page as the day as passed by.  Having my supplies and kit open on my tray on my desk as made the process easy and possible.  If I had to put away my supplies each day I would not get it done.  I have also been filming process videos for this mini album, which has been difficult. I complete my pages at night after work and sometimes my studio lights do not give great lighting.  For next week, I will try a "Flip Through" video to show the completed pages and describe what I used.  That may be a bit easier.  
The goal is to document one story a day and that has been my focus.  I have been lucky enough to have a story I have wanted to capture.  I will admit it is hard sometimes because throughout a normal work week I am in a routine with not that much going on.  So I am taking the time to slow down and look at my life and document the good the bad and simplest regular things that usually would go unnoticed in my life. 
             

I also need to stop the madness of comparing my work to others.  I fall in love with everyone's posted layouts and want to scrap lift everyone's.  I love my album too, I just get so inspired by others.


I think I purchased way too many supplies for my album.  I find myself overwhelmed with all the embellishments I have and try to use as much as I can on each layout, which is simply crazy thinking.  I have no idea why I am putting this much pressure on myself to have this mini album be perfect.  Despite all those little rants, I am still enjoying the process.  LOL.  I have a process video for this first 6 pages in my album for your viewing pleasure.


EVI

December Daily: Supplies


Its is my first time doing December Daily and I have hardly any Christmas themed items in my stash.  It has usually not been my style of scrapbooking.  The concept of December Daily is perfect to do year after year.  Its a tradition I hope I will love to continue even when I have children.  Ali Edwards was the creator or this project, she offers classes and kits to make your album cohesive.  For my first year, I decided to put together my own kit with items I enjoyed.  I did a online shopping as well as craft stores.  I did plenty of research with YouTube to become inspired.    I decided to keep my album very classic and traditional.  I do not do "cutesy" scrapbooking.  I do not want cartoon like santas, elves or snowmen on my layouts.  It is simply not my style. 

I started out with the Heidi Swapp collection "Oh What Fun" 12x12 paper pad, die cuts, stickers and wood veneer purchased on Blitsy.com.  I then loved the My Minds Eye "Cozy Christmas" and "Market Street" ephemera packs and loved the number tags in the set.  I decided to keep traditional Christmas colors of green, red, black, white, kraft and gold accents.  It is the easiest colors to buy an abundance of.   I fell in love with the American Crafts "Deck the Halls" collection and decided on the Project Life value kit which I picked up on allscrapbooksteals.com.  Also from this website were a handful of 12x12 papers from My minds eye, Carta Bella, American Crafts.  I live close to a Michael's and Hobby Lobby, so a few items were also picked up like 6x6 paper pads, stickers, brads and alphas have been collected from these large craft box stores.  I signed up to take the Gossamer Blue December Daily Class this year and I received a 6x8 clear stamp set.  

My organization is on a white acrylic serving tray from Target and a few small bowls.  I tried to fit all my supplies into a plastic Iris 12x12 box that I am sure many are familiar with but it simply did not fit.  I will leave the tray on the side of my craft table that way it is always out and available for me to work with.  It has compartments so that I can see all my supplies and not hide anything.  


The added details to my kit include ribbons, glitter, stamps, dollies, washi tape, red embossing powder and twine from my stash.  This will be my first year participating with this project and I cannot wait to see the outcome.  I feel prepared and organized for this project.  There is a detailed video on my YouTube Channel for your viewing pleasure.  
Evi

Mixed Media Scrapbook Layout: Wild & Free

Good Morning, afternoon or evening, depending when you are stopping by.  Thank you so much for visiting my blog for this month's blog hop with the Clique Kits.  I have enjoyed participating this event each month for the last 6 months.  I love visiting everyones creations as well.  This month's kit features the We R Memory Keepers 'Wildflowers' Collection.  The rich jewel tone colors in this collection are simply gorgeous.  
 I started by cutting apart the cut apart sheet named Flea Market.   The twine linking all the tags together was in the kit.  I love the texture it adds to the layout.  The amber colored background patterned paper is Wildflower.  I layered Road Trip behind my photo.  
 I always love adding a bit of mixed media to each of my layouts.  I start off with adding white gesso to the center of the layout.  I use the packaging technique to apply Distress Paint in Bronze to the layout along with Tattered Angles shimmer mist in Apricot Jelly.  I then mix modeling paste and the Bronze Distress Paint together and apply if with a palette knife and a Prima Marking stencil named Petite Floral.  I keep my mixed media to the center of the page.  I add my journalling another card from the sheet.  The stickers on the layout are also from the collection.  I add some washi tape from Jen Hadfields DIY home and finish the layout with Navy and Gold Color Shine from Heidi Swapp.  
I've provided my process video for your viewing pleasure.  

The layout has rich fall colors and I love it.   I appreciate you stopping by and I've provided the list to continue on with the blog hop.  

Clique Kits https://cliquekits.wordpress.com/
Gia http://www.giaaloha.wordpress.com/
Erica http://ericarosecreates.blogspot.com/
Kim* http://krodesigns.blogspot.com/
Justyna* http://made-by-justt.blogspot.com/
Kim Allen http://kimsscrappyblog.blogspot.com/
Candace* http://findingeverydayperfection.com/
Donna* http://scrappydonna.blogspot.com/
Marcia* http://onescrapatatime-bymumsie.blogspot.com/
Caroli* www.carolinaschulz.com
Aliza* http://peopleofthescrapbook.blogspot.com/
Janet Zeppa www.janetsjoy.blogspot.ca
Leeann Pearce http://thepaintbrushgoesspottie.blogspot.com.au/
Melissa Vining http:yesterday2day4ever.blogspot.co.nz
Charity Feit http://scrapfaire.blogspot.com
Hannah Lemieux http://scrapbookpagesandcupcakes.com
Leigh http://www.artfulleighcreative.com
*Evi http://lifewithevi.blogspot.com/
Emma Pescott http://emslifedocumented.blogspot.co.nz
Tarrah Mclean http://livetoscrapscraptolive.blogspot.com.au/
Wendy Antenucci http://antenucci.blogspot.com
Sandy Gonzalez http://craftythought.com
Megan www.craftymeggy.com


EVI

December Daily 2015: Album Cover


December Daily is a popular month long project that Ali Edwards created.  She has main streamed the idea into our scrapbooking community.  This is my first year participating in the project and I am truly excited.  I did not want to purchase a pre-made kit.  I wanted to put my own kit together with products I knew I would love and want to use.  I hardly buy themed scrapbook collections, so I had minimal "Christmas" items in my stash.  Most of my products have been purchased over the past few months.  I will be documenting my journey through the month of December.  I encourage you to subscribe and join the festive fun.
I started out with a 6x8 Project Life album I had purchased a few months ago on clearance from Michael's.  Its a classic black leather.  I thought it would work perfect to have my embellishments stand out against it.  The large snowflake and two small wood veneers was also from Michael's recently purchased that I heat embossed with gold tinsel and Glitz from Recollections.  The medium sized snowflake was purchased at Target in their dollar section recently, and it was in a 6 pack.  All four snowflakes are gorgeous and glittery in person and reflective in the light.  
I wanted the cover to resemble a wrapped gift.  So I added three different ribbons to achieve this look.  The solid sparkle ribbons are from Dollar Tree recently and the shiny red and green plaid was also picked up from Michael's recently.  The ribbons as well as the snowflakes were adhered with my hot glue gun.  Take your time and do zig zag application of the glue for a flatter appearance with the ribbon.  I learned this the hard way.  I wrapped the ribbons into the inside and fish tailed the plaid ribbon for a cleaner look inside the album.  I will be filling my album with 6x8 pocket pages as well as patterned holiday card stock to capture all my December memories.  I am so excited to do this project this year.  I hope I am as successful as others in completing it in the allotted time frame.  

I have provided my process video below for your viewing pleasure.  Stay tuned for upcoming videos for my December Daily like my homemade kit, prep, title page and weekly process videos.  Thank you for stopping by.
EVI


Homemade Scrapbook Kit

In attempts to scrap my stash, I have put together a homemade scrapbook kit.  As a scrapbooker, we undoudtedly hoard paper and collect massive amounts of scrapbooking essentials.  I have newly ignited my love for the hobby this year and in just a year my collection has grown.  I do my share of layouts a week, but not enough to ever keep up.  I have a weakness for new collections every single time one is released.  I have learned quick this year not to buy those paper pads with 200 sheets of patterned paper for a few reasons.  First, you never use them all.  Its just too much before you get tired of the collections.  Second, the pads are very very light weight.  Its not the lovely card stock I am used to from buying individual papers from the collection that can with stand my love of mixed media.  I, literally, place orders monthly for the latest and greatest from my favorite scrapbooking sites.  Box craft stores like Joann's, Michael's and Hobby Lobby do not carry the big brands in the scrapbooking world.  They make their own paper pad lines that simply cannot compete in my opinion.  

A year into this hobby again, and I already have a feel for the parts of collections I love and have to have... like the ephemera/ die cut packs and never ever the chunky chip board.  I'm not a lover of the enamel dots, but I do love me some stickers.  I am not a fan of anything that makes my layout too thick and bulky and I absolutely have to add some sort of mixed media from my art supplies to a layout.  Its just me and my style.  Adding mixed media to a layout combines both my worlds of art journaling and scrapbooking in one.  I have found my happy place.  

I do subscribe to one kit, the Clique kits.  I have tried the Hip Kit Club as well.  And while I could subscribe to another, I am realizing sometimes that I do not always love all aspects of these kits, like chipboard.  

While keeping these these ideas in my head I now do my monthly ordering strictly with the elements I like and love.  Hence, formulating my first homemade kit.   

Here were my steps to my kit.
#1. Start out with one patterned paper that the kit circles around.  
#2. Added patterned papers that highlighted the colors/ tones of the first sheet.  
#3. Add neutral to your kit as well for background and layering.
(keep in mind if you purchase a few papers from one collection, it does the job for you.)
#4. Add a metallic elements like gold or silver to add a bit of bling to the kit.  I shopped my stash of stickers and sequins to add this element.  
#5. Shop you stash of alpha, stickers and embellishments keeping with the same color family in your kit.  
#6. Add a 6x6 pad from your stash to use for lettering.  The entire pad may not work but if it has a few good neutrals, use it.  
#7.  Add washi tape from your collection.  I love adding wash tape to most of  my layouts and I have a ton in my stash.  
#8. Pick something that has been sitting in your stash that you have not used yet and challenge yourself to use it in at least one layout.  For this kit, I've been sitting on a denim 6x6 paper pad for months.  I have not touched it once.  I have to challenge myself to use it. 

You can finish off half used sticker sheets and use doilies that have been sitting around.  Once you start shopping you stash, all the other details come together.  I also went through my stamp collection and pulled one or two I wanted to make certain I used.  Did the same with ink pads, embossing powders, and mists.  I always have an element of mixed media and like to pull the color  that I can keep out readily available.  Don't be afraid to mix and match collections.  That is half the fun of it.  Using up odds and ends that are sitting or that we are hoarding.  

Below I have provided the video of my first kit I assembled for your viewing pleasure.  


I have provided the list of supplies I included:
EVI

How to Pack for a Crop

Going to a crop is always an excited time.  We are excited to see our scrappy friends and get as many layouts as possible done.  We always have big plans and with that comes the over packing.  I too fell victim to the over packing.  

Tip #1, use your luggage to hold your 12x12 iris boxes.  They fit into a standard 'carry on' sized luggage without any problem.  Why spend $50-100 dollars on a crop bag that you will use rarely.  I used my luggage and it worked just the same.  
Tip #2, take a kit for your crop.  I purposefully made a homemade kit a few days prior to take on the crop to prevent me from taking tons of random paper collections.  
Tip #3, plan your pages ahead of time.  This tip would have helped me complete more than  a few layouts while at the crop.  
Tip #4, Pack all your essentials in a tool tote.  I used the Craftsman Pink 12" tool box.  This worked perfectly to hold all my essentials and mixed media supplies.  Also, mark your paint brushes, pens, scissors with a piece of colorful washi tape to mark which ones are yours.  
Essential list:
Paper trimmer, scissors, adhesive, pens/pencils, palette knives, baby wipes, paper towels, craft mat, ruler, brushes, tape runners, tiny attacher, hot glue gun and a heat gun.
Essential list for mixed media:
White card stock, gesso, modeling paste, paints, mists, watercolors, gelato, mist bottle, stencils, packaging, ink pads, gift cards, wax paper, stamps, versa mark and embossing powders.
Tip #5, if you like doing mixed media, make sure your mists and paints travel well and do not spill.  I used a separate tupperware for save traveling.  
Tip #6, pack an extension cord to guarantee you have power for your heat gun or hot glue gun that reaches you at your table.
Tip #7, pack an art journal or an adult coloring books as well, in order to take a break from scrapbooking but continue to be doing something creative.  
Tip #8, have one person bring a cuttlebug or Big Shot, etc. and the rest of your friends bring just dies.  It saves everyone from packing their machines.  
Tip #9, don't forget page protectors to file away your layouts safely, or have a box assigned to hold your completed layouts so they do not get damaged on your way home from a crop.
Tip #10, do not forget to print your photos. 

Hope these tips help you on your next crop, especially using your luggage.    

I have a packing video I will link below for your viewing pleasure.  Thank you for stopping by.

EVI


Mixed Media Scrapbook Layout: Sweet Moments

I have recently adopted a new little young male moxie, which we have named Kobe.  He is energetic, smart, playful and he has quickly stole my heart.  Every time I go for walks I take my phone so that I can easily snap a pic or two.  Of course I have him in a cute bow tie collar in addition to his harness.  I am that dog mom.  So this is a cute pic caught while on our walk near a lake.  He hopped onto the steps and looked ever so causally to the side and I was ready with my phone.  How cute is he!!! So as a scrapbooker, I knew I had a worthy pic to scrap.  I am using my Clique Kit from October which featured the PinkFresh Studio 'Happy olI used a portion of the ______ patterned paper to begin  my layout.  
I used the Ranger circular blending tool to add the additional circles in matching acrylic paints from my stash.  I have iridescent medium with a confetti type of stencil from Heidi Swapp to add more circles to the layout.  I used a 2 inch circle punch and the cut apart page for my dies.  And the puffy stickers used are also from the Pink Fresh Collection.  I painted some of the wood veneer stickers from is collection to match the paint circles I already added.
In my stash I have many alpha stamps.  These are the largest set I own from Paper Studio from Hobby Lobby.    I black heat embossed the letters for my title.  I was careful and took my time as to not get a bunch of smudges everywhere.   The photo was matted heavy with simple copy paper.    
The Heidi Swapp roller date stamp with Stazon Ink and finished it with some black ink splatters.  I have added my process video for this layout for your viewing pleasure.  Thank you so much for stopping by.  

EVI

Mixed Media Scrapbook Layout: Love, Smile & Laugh

The colors in the Documentary are grey, creams, magenta, teal, yellow and a wine red.  They are beautiful together.  I have enjoyed working with this collection documenting my trip to NYC to see my sister with my mom.  We had such a fun girls weekend.    The background paper I started with is called Party Animal and I applied white gesso to it in order to tone down the pattern and to be able to add mixed media to it.  I used the ever so popular "packaging technique" to apply the gelatos (passion fruit, bubblegum pink, lavender and cherry red) and my Lindy Stamp gang mists in Magnolia Magenta Gold and Hottie Patottie Hot Pink.    
I went a little cray cray on the gelato mixed media part.  I think I covered the entire page.  The die cuts are from the collection's pack.  I just love the florals and the tiny little bird.  I always save the branding stripes at the bottom of patterned papers to use on layouts.  The bottom two stripes are exactly that; branding strips.  
The words 'love, smile and laugh' are dies from Hobby Lobby.  I used black card stock and my cuddle bug to cut them.  The words truly pop from the background.  I have linked my process video below for your viewing pleasure.  Thank you as always for stopping by. 

Evi

Mixed Media Scrapbook Layout: Happy New Dog


Hello all my scrappy friends.  Thank you so much for stopping on my the Clique kit blog hop.  The October Clique Kits feature the Pink Fresh Studio "Happy Things" collection.  These kits are just fantastic and give you a great variety of collection.  Today I am scraping pictures of me and my new doxie I just rescued last week.  I took him out to the local farmers market where he did great and I took these pics while resting on a bench together. I have a ton of pictures now to scrap with my two doxies together.  They are just the cutest.  My first doxie, Zoe, who you've seen me scrap before, is getting along great with this little guy who we have named Kobe.  
I started out with a triangle patterned stencil from Heidi Swapp that I wash taped out to make into a triangle.  I used my Lindy Stamp gang mists in Tiffany Lou Blue and Iridescent medium for my stencil work.  Of course no layout is complete without some splatters.  I cut out the triangle to use like ephemera from the Rustic Triangles patterned paper.  If you watch my video linked at the end, you will witness a accidental mistake that I left and made it work, instead of starting over.  I could have edited it out, but I want to include it to show that no one is perfect while scraping.  Even I make mistakes.  
I used a speciality vellum paper with gold triangle to add behind my photos.  I matted the photos on gold glitter paper from Heidi Swapp.  The alphas,  the 'happy' phrase and puffy  stickers are from the Pink Fresh Collection as well.  I used the exclusive cut apart paper from the Clique Kits for the phrase labels on the photos.  
I've been feeling a lack of creativity lately.  I feel like my layouts have not been up to my usual par.  Has  anyone ever felt like that?  I need some suggestions to get my creative juices flowing again.  I was thinking about following sketches, because I usually do not.  Or maybe scrap lift layouts to get my mind working again.  If you have ever been low on creative mojo, please suggest how you improved your state of mind.  Thank you as always for stopping by.  Here is process video:
October 2015 Line-Up
Clique Kits https://cliquekits.wordpress.com/
Gia http://www.giaaloha.wordpress.com/
Erica http://ericarosecreates.blogspot.com/
Leeann Pearce http://thepaintbrushgoesspottie.blogspot.com/
Maryam* http://maryamperez.blogspot.com/
Aliza* http://peopleofthescrapbook.blogspot.com/
Megan Blethen http://www.craftymeggy.com/
Emma Pescott http://emslifedocumented.blogspot.co.nz/
Melissa* http://yesterday2day4ever.blogspot.co.nz/
Kim http://krodesigns.blogspot.com/
Leigh http://www.artfulleighcreative.com/
Renee Aslette http://www.reneeaslette.blogspot.com/
Kat* http://kraftykat9.blogspot.com/
Sandy Gonzalez craftythought.com/
Tyra Babington http://justtyra.com/
Marcia* http://www.onescrapatatime-bymumsie.blogspot.com/
Kim Allen http://kimsscrappyblog.blogspot.com/
Candace* http://findingeverydayperfection.com/
Rhonda Van Ginkel http://snapwhiz.blogspot.com
Hannah http://scrapbookpagesandcupcakes.com
Evi  http://lifewithevi.blogspot.com
Janet Zeppa http://janetsjoy.blogspot.com/
Thank you,
Evi